Checkout
General
How do I add a Custom CSS File to the Checkout?
You can add a custom CSS file to the checkout by creating a checkout.css file in your public directory.
Example contents where we are changing the checkout to use a black background:
.header {
    background-color:#000000;
}

.header__progress li:before {
    background-color:#ffffff;
    border-radius: 0;
}

.header__progress li.current:before {
    background-color:#ffffff;
}

.header__progress li.active {
    color: #00ea00;
}

.header__progress li.active:after, .header__progress li.active:before {
    background-color: #00ea00;
}

.header__progress li, .header__progress li.current {
    color:#ffffff;
}
You can also place this file in your theme if preferred.
How do I change the logo in the checkout?
You can change the logo in the checkout by creating this file: resources/vendor/checkout/sections/logo.twig and putting your logo contents inside of it.
Example contents:
<a href="{{ route('home') }}" title="{{ trans("checkout::general.return_to_store_link") }}">
   <svg xmlns="http://www.w3.org/2000/svg" viewBox="0 0 764.8 178.1" xml:space="preserve">
       <path fill="#383d5a" d="M675.8 178.1c-49.1 0-89-39.9-89-89s39.9-89 89-89 89 39.9 89 89c0 49-39.9 89-89 89m0-138.1c-27 0-49 22-49 49s22 49 49 49 49-22 49-49-22-49-49-49M570.4 63.7C569.9 28.2 540.3 0 504.9 0h-54.8c-2.3 0-4.4 1.4-5.3 3.6l-66.4 166.7c-1.5 3.7 1.3 7.8 5.3 7.8h30.9c2.3 0 4.4-1.4 5.3-3.6l16.7-41.9c.9-2.2 2.9-3.6 5.3-3.6h37.7c2.3 0 4.4 1.4 5.3 3.6l16.7 41.9c.9 2.2 2.9 3.6 5.3 3.6h30.8c4 0 6.7-4 5.3-7.8l-16.5-41.4c-.6-1.5.2-3.2 1.7-3.7 24.8-9.2 42.5-33.3 42.2-61.5M505.3 89h-47.2c-2 0-3.4-2-2.6-3.9l17.3-43.4c.4-1.1 1.5-1.8 2.6-1.8h30.5c13.4 0 24.3 10.7 24.5 24C530.6 77.8 519 89 505.3 89M190.4 170.3l-67-166.7c-.9-2.1-2.9-3.6-5.3-3.6h-46c-2.3 0-4.4 1.4-5.3 3.6L.4 170.3c-1.5 3.7 1.3 7.8 5.3 7.8h30.8c2.3 0 4.4-1.4 5.3-3.6l16.7-41.9c.9-2.2 2.9-3.6 5.3-3.6h63.1c2.3 0 4.4 1.4 5.3 3.6l16.8 41.9c.9 2.1 2.9 3.6 5.3 3.6h30.9c3.9 0 6.7-4.1 5.2-7.8m-113-85.2l15.1-38c.9-2.4 4.3-2.4 5.3 0l15.3 38c.7 1.9-.6 3.9-2.6 3.9H80c-2 0-3.4-2-2.6-3.9"></path>
       <path fill="#54e0e4" d="M330.9 178.1c11 0 20-9 20-20s-9-20-20-20H216.8c-4 0-6.8 4.1-5.3 7.8l11.5 28.7c.9 2.1 2.9 3.6 5.3 3.6h102.6zM386.3 0h-225c-4 0-6.8 4.1-5.3 7.8l16.6 41.4c1.3 3.2 4.4 5.3 7.9 5.3h84.3c2.4 0 4.7-1.5 5.6-3.8l3.6-8.9c.5-1.1 1.6-1.9 2.8-1.9h109.1c10.8 0 20.1-8.4 20.5-19.3.3-11.2-8.8-20.6-20.1-20.6M358.6 69H189c-4 0-6.8 4.1-5.3 7.8l16.6 41.4c1.3 3.2 4.4 5.3 7.9 5.3h29c2.5 0 4.7-1.5 5.6-3.8l3.6-8.9c.5-1.1 1.6-1.9 2.8-1.9h108.9c10.8 0 20.1-8.4 20.5-19.3.4-11.2-8.7-20.6-20-20.6"></path>
   </svg>
</a>
Slots
What are the available checkout slots?
Item Slots
item.info
How do I inject into checkout slots?
Checkout Slots allow you to add content within existing admin pages. The examples below show how to inject a view into the cart item list.
For a simple use case, simply provide a view:
\Aero\Checkout\CheckoutSlot::inject('item.info', 'acme::cart-item');For more advanced use cases, instead of passing a view directly, you can provide a callback function:
\Aero\Checkout\CheckoutSlot::inject('item.info', function ($data) {
    // add custom variables to the $data array

    return view('acme::cart-item', $data);
});
These injections should typically sit inside the boot method of a Service Provider
Tutorials
How do I add a marketing opt-in to the checkout?
This article covers how to insert a checkbox into the checkout flow, that when ticked, will allow you to send information to a third party system.
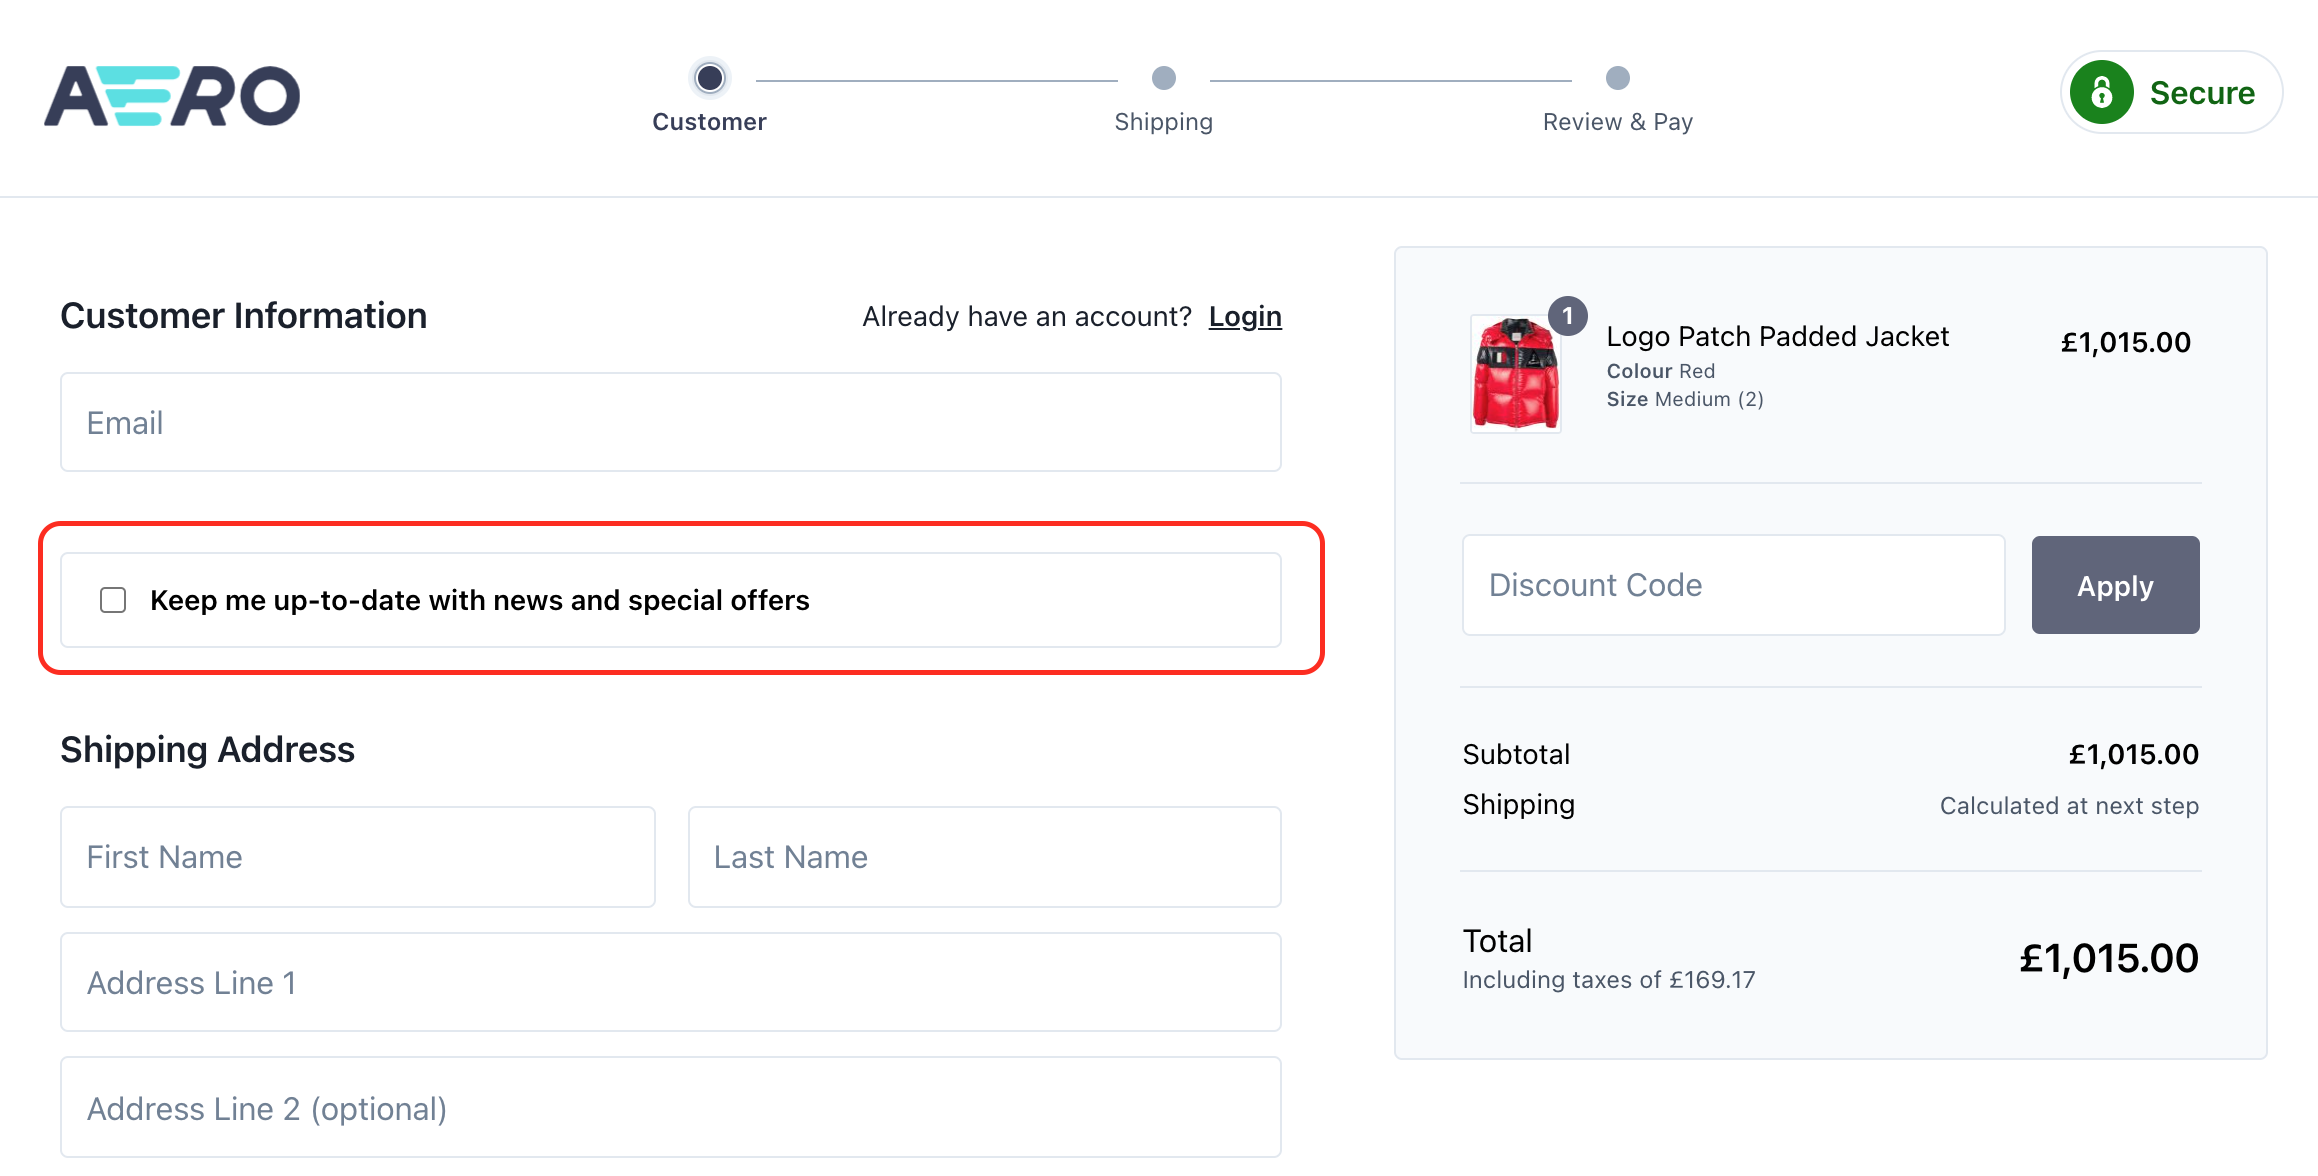
In order to add a marketing optionally opt-in to the checkout we first need to extend the CheckoutCustomerPage to inject our custom view that will show the checkbox for the customer to interact with:
\Aero\Checkout\Http\Responses\CheckoutCustomerPage::extend(function (\Aero\Checkout\Http\Responses\CheckoutCustomerPage $page, \Closure $next) {
    $sections = $page->getData('form_sections');

    $customerSectionIndex = $sections->keys()->search('customer', true);

    $sections = $sections->splice(0, $customerSectionIndex + 1)
        ->put('opt_in', 'checkout.opt-in')
        ->merge($sections);

    $page->setData('form_sections', $sections);

    $order = $page->cart->order();

    if ($order && ($optIn = $order->additional('opted_in'))) {
        $page->setData('opted_in', $optIn);
    }

    return $next($page);
});
We then need to create our Twig view file, which should be placed in resources/views/checkout/opt-in.twig:
<div class="checkout__section">
    <div class="checkout__list">
        <ul>
            <li>
                <label>
                    <input type="checkbox" name="opted_in" value="1" {{ old('opted_in', opted_in) ? 'checked' : null }} />
                    <span><strong>Keep me up-to-date with news and special offers</strong></span>
                </label>
            </li>
        </ul>
    </div>
</div>
We now need to ensure that the checkbox choice is remembered and stored against the order:
\Aero\Checkout\Http\Responses\CheckoutCustomerSet::extend(function (\Aero\Checkout\Http\Responses\CheckoutCustomerSet $page \Closure $next) {
    $data = \Illuminate\Support\Facades\Validator::make($page->request->all(), [
        'opted_in' => 'sometimes|bool',
    ])->validate();

    $optedIn = $data['opted_in'] ?? null;

    if (($order = $page->cart->order()) && ($optedIn !== null || $order->additional('opted_in'))) {
        $order->additional('opted_in', $optedIn);
    }

    return $next($page);
});
Finally, now that the checkbox shows on the checkout and it saves against the order as an additional attribute, we can use this in our code, for example when an order is placed, we can send their email to a third party (if they opted in):
\Illuminate\Support\Facades\Event::listen(\Aero\Cart\Events\OrderPlaced::class, function (\Aero\Cart\Events\OrderPlaced $event) {
    if ($event->order->additional('opted_in')) {
        $email = $event->order->email;

        // Send $email to a third party...
    }
});